
 Prettify is developed by Mike Samuel from Google and is used for displaying code snippets in webpages in a more presentable manner. It is lightweight and gets easily integrated into Blogger. It has four different themes to choose from and also supports C-like and XML-like language's syntax highlighting . In this tutorial we will be seeing how to implement it in your blog and also checking out some of its options. Lets get Started then
Demo
Video Tutorial
Step by Step Guide
1. Go to Blogger Dashboard and then to Template > Edit HTML

2. Now Search (Use CTRL+F) for </body> and add the following JavaScript just before it ( The Code below is very lengthy , copying it manually would be a bit difficult , Use the Copy to Clipboard option)
3. Now search for ]]></b:skin> tag and add the following CSS just before it
.kwd{color:#93C763}
.com{color:#66747B}
.typ{color:#678CB1}
.lit{color:#FACD22}
.tag{color:#8AC763}
.atn{color:#E0E2E4}
.dec{color:purple}
pre.prettyprint{border:0 solid #888}
.prettyprint{background:#000}
li.L0,li.L1,li.L2,li.L3,li.L4,li.L5,li.L6,li.L7,li.L8,li.L9{color:#555;list-style-type:decimal}
li.L1,li.L3,li.L5,li.L7,li.L9{background:#111}
.str,.atv{color:#EC7600}
.pun,.pln{color:#F1F2F3}
.prettyprinted{word-wrap:break-word;background:#000;border-radius:10px}
@media print {
.com{color:#600;font-style:italic}
.typ{color:#404;font-weight:700}
.lit{color:#044}
.pun{color:#440}
.pln{color:#000}
.atn{color:#404}
.str,.atv{color:#060}
.kwd,.tag{color:#006;font-weight:700}
}
Note : In case you can't find or its commented out then add the CSS in a style tag just before the </head> tag
4. Save the Template and now you are ready to share Code on your blog in a prettier way !
For adding Code
1. Create a New Post
2. In the HTML section of the Post Editor add your code enclosed in a pre tag like below
 <pre class="prettyprint" >

</pre>
You can also use the code tag instead (Its the HTML5 Convention)
 <code class="prettyprint">
...
</code>
Note: Make sure to Esacpe your Code before pasting it inbetween the pre or code tag . You can Bookmark the Postify Tool for escaping purposes
Some Options
To display Line Numbers
If you want all the lines of the code to have a line number preceding it , then add linenums class in the pre tag
 <pre class="prettyprint linenums" >

</pre>
Language Support
It supports C and friends, Java, Python, Bash, SQL, HTML, XML, CSS, Javascript, and Makefiles . In case you want to display any other language then extensions are available for the following Apollo; Basic; Clojure; CSS; Dart; Erlang; Go; Haskell; Lasso; Lisp, Scheme; Llvm; Logtalk; Lua; Matlab; MLs: F#, Ocaml,SML;Mumps; Nemerle; Pascal; Protocol buffers; R, S; RD; Rust; Scala; SQL; Swift; TCL; Latek; Visual Basic; VHDL; Wiki; XQ; YAML.
After including the Script for the extension you will have to specify a class in the pre tag
 <pre class="prettyprint lang-*">
 The lang-* class specifies the language file extensions.
  File extensions supported by default include
    "bsh", "c", "cc", "cpp", "cs", "csh", "cyc", "cv", "htm", "html",
    "java", "js", "m", "mxml", "perl", "pl", "pm", "py", "rb", "sh",
    "xhtml", "xml", "xsl".
</pre>
In HTML5 , it would be like
<pre class="prettyprint"><code class="language-*">...</code></pre>
Adding Comments in Code
Comments can be added in the following manner
int x = foo();  /* This is a comment  This is not code
  Continuation of comment */
int y = bar();
Different Themes
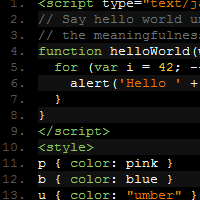
The theme given above is by Alex Ford , There are 3 more themes available . To apply them just replace the CSS in Step 3 Above with any one of these
Sunburst

pre .kwd,code .kwd{color:#E28964}pre .com,code .com{color:#AEAEAE;font-style:italic}pre .atn,code .atn{color:#bdb76b}pre.prettyprint,code.prettyprint{background-color:#000;-moz-border-radius:8px;-webkit-border-radius:8px;-o-border-radius:8px;-ms-border-radius:8px;-khtml-border-radius:8px;border-radius:8px}pre.prettyprint{width:95%;white-space:pre-wrap;margin:1em auto;padding:1em}ol.linenums{margin-top:0;margin-bottom:0;color:#AEAEAE}li.L0,li.L1,li.L2,li.L3,li.L5,li.L6,li.L7,li.L8{list-style-type:none}pre .str,code .str,pre .atv,code .atv{color:#65B042}pre .typ,code .typ,pre .tag,code .tag{color:#89bdff}pre .lit,code .lit,pre .dec,code .dec{color:#3387CC}pre .pun,code .pun,pre .pln,code .pln{color:#fff}@media print{pre .com,code .com{color:#600;font-style:italic}pre .typ,code .typ{color:#404;font-weight:700}pre .lit,code .lit{color:#044}pre .pun,code .pun{color:#440}pre .pln,code .pln{color:#000}pre .atn,code .atn{color:#404}pre .str,code .str,pre .atv,code .atv{color:#060}pre .kwd,code .kwd,pre .tag,code .tag{color:#006;font-weight:700}}
Default

.pln{color:#000}
pre.prettyprint{border:1px solid #888;padding:2px}
ol.linenums{margin-top:0;margin-bottom:0}
li.L0,li.L1,li.L2,li.L3,li.L5,li.L6,li.L7,li.L8{list-style-type:none}
li.L1,li.L3,li.L5,li.L7,li.L9{background:#eee}
@media screen {
.com{color:#800}
.lit{color:#066}
.pun,.opn,.clo{color:#660}
.fun{color:red}
.str,.atv{color:#080}
.kwd,.tag{color:#008}
.typ,.atn,.dec,.var{color:#606}
}
@media print,projection {
.com{color:#600;font-style:italic}
.typ{color:#404;font-weight:700}
.lit{color:#044}
.pun,.opn,.clo{color:#440}
.atn{color:#404}
.str,.atv{color:#060}
.kwd,.tag{color:#006;font-weight:700}
}
Desert

pre.prettify{display:block;background-color:#333}pre .nocode{background-color:none;color:#000}pre .com{color:#87ceeb}pre .lit{color:#cd5c5c}pre .atn{color:#bdb76b;font-weight:700}ol.linenums{margin-top:0;margin-bottom:0;color:#AEAEAE}li.L0,li.L1,li.L2,li.L3,li.L5,li.L6,li.L7,li.L8{list-style-type:none}pre .str,pre .atv{color:#ffa0a0}pre .kwd,pre .tag{color:#f0e68c;font-weight:700}pre .typ,pre .dec{color:#98fb98}pre .pun,pre .pln{color:#fff}@media print{pre.prettify{background-color:none}pre .com,code .com{color:#600;font-style:italic}pre .typ,code .typ{color:#404;font-weight:700}pre .lit,code .lit{color:#044}pre .pun,code .pun{color:#440}pre .pln,code .pln{color:#000}pre .atn,code .atn{color:#404}pre .str,code .str,pre .atv,code .atv{color:#060}pre .kwd,code .kwd,pre .tag,code .tag{color:#006;font-weight:700}}
Moving from Syntax Highlighter
In case you have been using Syntax Highlighter for a long time and want to shift to Prettify , It would be impractical to change all the class names of each code block till now from brush: something to prettyprint. To overcome this problem I have a small trick. In the JavaScript file above search for /\bprettyprint\b/ and /\blinenums\b and replace them with /\bbrush:\b/ and /\bxml\b ( Here I am assuming you used the xml brush in all the codes ) . This will apply Prettify to all the Code Blocks and also add the Line Number as they were shown in Syntax Highlighter.
Hope the tutorial made it easy for you to embed code snippets in your blog. Don't hesitate to ask if you face any problems while implementing or using it
Prettify is really cool and thanks for writing this article. Its clear and perfect. Even noobs can easily implement this.
Thanks for the valuable information.
thank you! keep on posting quality posts~
Thanks! Nice article
Thank you so much for this awesome tutorial!!
Hi Prayang I want ask you which is better, Google Prettify or Syntax Highlither. I hope you can tell me which is better :)
Hi Danial
Both these comes with their own benefits and shortcomings
Syntax Highlighter has options like Copy to Clipboard , View Source but requires a separate JS and CSS file to be included for each language separately for it to apply Syntax Highlighting
Whereas Prettify is a more lighter of the two and supports more languages straight out of the box but lacks Copy to Clipboard and Collapse code feature .
In the end its a matter of your choice . To sum it up in a few words
Syntax Highlighter - For easy Copying
Prettify - For faster load times
Thanks for the compliment Bharat , you do a even better job at WPSquare
I try to create tutorials that can be easily understood by anybody even non-coders
I am glad Andreas that you liked it , Feel free to ask if you face any problem while implementing it or using it
Thanks Sibin for your comment
Hope this makes code sharing easier for you
Thanks @HeyAzwan for the comment
I will try to keep the quality and usefulness highest for each post I Release
Thanks for the comment Trever
Owh.. that is the different. I more like Syntax Highlighting because easy Copy to Clipboard, just like you say but I am like Prettify because light(fast loading).
Now I am thinking which one is better SH or Prettify and the result is I rather pick Syntax Highlighting because thier have Collapse code feature just like you use it on this post.. Thanks a lot Prayang may good bless you :D
Thanks for awesome Tutorial Prayag..
Thanks for the comment and compliment Rahul , You have done a awesome job with your blog , it has such useful information related to Social Media. Keep up the effort
Having a problem with it.Hope you will help.When I am using this if I want to display a html script inside a syntax-highlighting box, the script whixh I wanna display does not appear but the codes of the script makes an automatic widget or anything ,means if I want to write the process of making something it makes the thing .Please help thanks.
Hi Avinash
I suppose you are missing the step of Escaping the code . Use Postify to escape code and then paste this Escaped code into the Syntax Highlighting box
Cool! thanks. Added to my blog.
Hi, I'm having a problem with code coloring, code blocks have a black background but nothing else happens.
HTML code appears in gray.
I Used syntax highlighter but I already removed all the script tags (I don't have many posts in my blog), what could be the problem?
thanks!
owesome post yar
It doesn't work for me too. I have same problem as Naor Ami (background is dark, no highlight). I have a dynamic view in my blog.
cool dude...
help for a blog beginners..
superb !! Extremely Good...
Very nicely written, thank you. Which do you prefer, Prettify or SyntaxHighlighter? This blog uses SyntaxHighlighter, so I was wondering if one has advantages over the other. Although I have a bit of a soft spot for Prettify.
Hey i am facing the problem. It doesnt works the same in my case, On applying the "pre" tag to the java code. The css gets applied but the no of linings doesnt gets showed up nor does the code gets showed only the black background gets showed. Please help???
Also i go the error in firebug "ReferenceError: prettyPrint is not defined".
hi prayag , i am trying to apply prettify , but it is not showing in a separate frame just like yours , also i want to know about how to change css and styling of my blogs , just like yours , it's awesome
Hello, I wanted to prettify some linux console examples and it would be good if no highlighted is set, maintaining the beatiful box (my theme is Sunburst I guess)
Hi,
i am try use prettify on blogger, but it seems that it has problem when posting C language, especially with the "less than" and "bigger than" signs. Does anybody have similar experience?
I did implement this on my blog
I am really happy to use it, I would like to share this on my site, plz let me know how can i share this and keep it for future reference
I really liked your comment box. How are you able to tell it. my e-mail: robiwebbusiness@gmail.com
Hi all, I have another choice for hightlight the source code. If you don't want your blog run a little slowly, you can generate the source code online, then copy it to your blog. More easier and faster, right?
This is my online tool.
http://www.phamngoctan.com/2013/11/format-source-code-for-blogger.html
Currently, I have 6 theme for you to choose which kind of color you want to show in your website. I will develope more. Hope this online tool will be useful for all of blogger.
Thanks for this post. It's working and easy to apply no bullshit of brush system :)
Take a look
http://codinggiri.blogspot.in
Once again thanks for this post
Nice post Prayag. I'd implemented this on my blog (http://www.josephstutorialshop.blogspot.com).
But I'm facing a problem that some lines of code are exceeding the border..! How can I fix that?
Thankyou it works and cool looking
Hey, nice tut!
How do i add the SQL extension??? Where exactly????
Hi Prayag,
Thanks for this post. Is it possible to use two different themes on a site?
Hey,
Good stuff thanks a lot for this post
thank you too much or the post
but i want to know how to add 'copy to clip board' button
Thanks for your helpful information.
I have a problem is how to make the 'linenums' is not just 5, 10, 15 ... but also 1, 2, 3, 4, 5, 6 ...
How can I solve it?
This was really helpful. I did add a bit to ensure wrapping in Firefox, because it wasn't happening. But thanks- this started me off.