
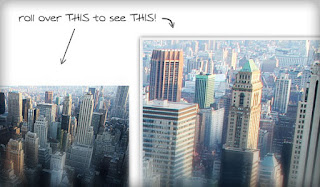
 Easy Zoom is a lightweight & highly customizable jQuery plugin that will allow users to see larger details of the image while moving cursor over medium sized image.

Steps to Add it to Blogger:
1.Login to the Blogger account.
2. Now Go to Design > Edit HTML.

Now search for the ]]></b:skin> tag and paste the following code just Above/Before it.

3.Now search for the </head> tag and paste the following code just Above/Before it.
<script type="text/javascript" src="https://ajax.googleapis.com/ajax/libs/jquery/1.4.4/jquery.min.js"></script>
<script type="text/javascript" src="http://dl.dropbox.com/u/27675057/Easy%20Image%20Zoom/easyzoom.js"></script>
<link href="http://dl.dropbox.com/u/27675057/Easy%20Image%20Zoom/default.css" rel="stylesheet" type="text/css" media="all" />
<script type="text/javascript">
jQuery(function($){
$('a.zoom').easyZoom();
});
</script>
Now search for the ]]></b:skin> tag and paste the following code just Above/Before it.
/* Edit width, height and placement of the dynamically created image zoom box. */

#easy_zoom{
width:600px;
height:400px;
border:5px solid #eee;
background:#fff;
color:#333;
position:absolute;
top:50px;
left:700px;
overflow:hidden;
-moz-box-shadow:0 0 10px #777;
-webkit-box-shadow:0 0 10px #777;
box-shadow:0 0 10px #777;
/* vertical and horizontal alignment used for preloader text */
line-height:400px;
text-align:center;
}
2.Go to the Post/Page you want to add the Easy Zoom and go to Edit HTML tab .

3.Now copy the code from below and paste it there.
<script type="text/javascript" src="https://ajax.googleapis.com/ajax/libs/jquery/1.4.4/jquery.min.js"></script>
<script type="text/javascript" src="http://dl.dropbox.com/u/27675057/Easy%20Image%20Zoom/easyzoom.js"></script>
<link href="http://dl.dropbox.com/u/27675057/Easy%20Image%20Zoom/default.css" rel="stylesheet" type="text/css" media="all" />
<script type="text/javascript">
jQuery(function($){
$('a.zoom').easyZoom();
});
</script>
<style>

/* Edit width, height and placement of the dynamically created image zoom box. */

#easy_zoom{
width:600px;
height:400px;
border:5px solid #eee;
background:#fff;
color:#333;
position:absolute;
top:50px;
left:700px;
overflow:hidden;
-moz-box-shadow:0 0 10px #777;
-webkit-box-shadow:0 0 10px #777;
box-shadow:0 0 10px #777;
/* vertical and horizontal alignment used for preloader text */
line-height:400px;
text-align:center;
}

</style>
4.Now for adding the images into Easy Zoom Firstly add the image normally using Insert Image button
Now When you see the code in the edit HTMLwindow it would be something like this
| <a href=" large3.jpg"=""><img border="0" height="90" src="/small3.jpg" width="120" /></a> |
Make it like this
| <a href=" " class="zoom" ><img src=" " /></a> |
As you can see we added only a class="zoom".
5.Now save the Post/Page and see the magic.
its not working in my blog.. wat could b the prob ? plz help. thank you